Reflection projects are a little-known but very handy feature in Primavera P6 Professional. A Primavera P6 Reflection project is essentially a copy of a project but with one snazzy built-in trick – the ability to merge the copied project back into the original at any time. If the genius of this trick hasn’t struck you yet, it will.
This merging ability was designed to help planners work with scenario projects.
Let’s say you’re the planner for a large capital project that is a falling behind schedule. The boss wants you to assess the impact of adding an extra shift to the work schedule. How much time can be caught up with this approach (ie: scenario)?
The thing to do here is to create a Reflection of the project in Primavera P6, add an extra shift and verify the finish date. If the boss approves the extra shift, then you can merge this scenario project into the original project along to keep the changes you made.
Primavera P6 reflections save you the time of renaming projects, resetting permissions and copying and pasting changes from one project to another. There are also some nice options to help you create a backup of the original project in case you need to reference it again in the future.
Step 1 – Creating a Reflection project in Primavera P6
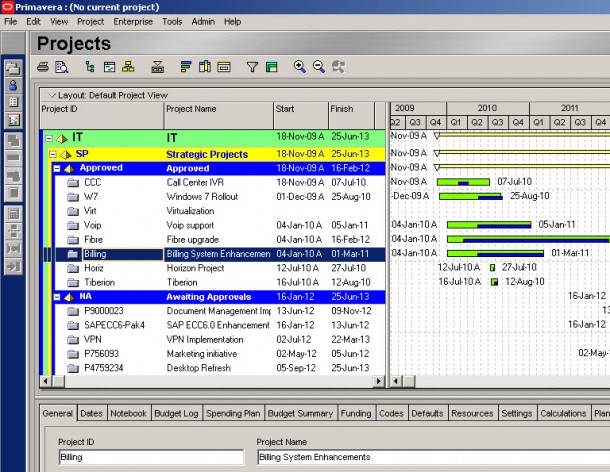
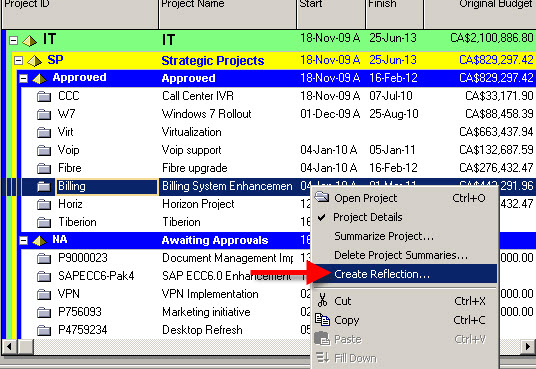
From the Projects window, right-click on the original project and select Create Reflection from the menu.
If the original project has any baselines you will see pop-up window where you can select whether or not to copy these baselines into the reflected project. Simply mark the checkbox in the Copy column if you want to preserve any baselines in the Reflected project.

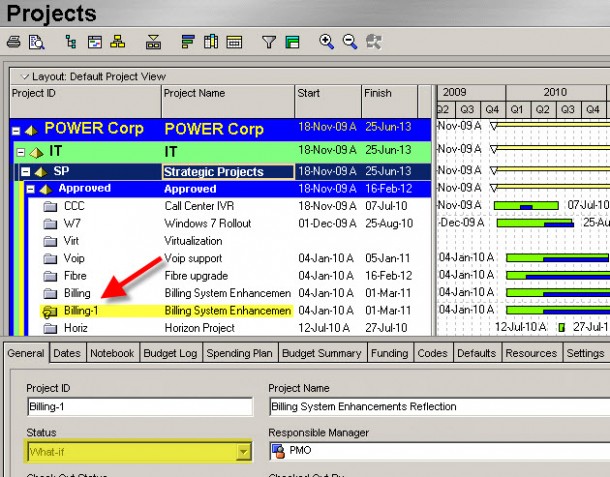
You should now see a copy of your project in the Projects window. The copy will have the same Project ID with “-1” appended. This reflection project will also be marked with a Status of “What-If” which is Primavera’s way of indicating the project is a “scenario” project and not a real project plan.
Step 2 – Open the Reflection project and Activity Layout
You Primavera P6 reflection project is now created and ready for editing.
Now it’s time to run your scenario – ie: you can now make changes to the Reflection project to run your scenario, test out a hypothesis, etc.
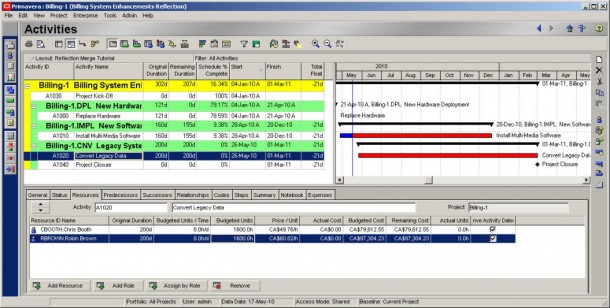
In this tutorial, we’ll make a small change to the reflection project’s resources.
Open the Project and then Open the Activity Layout provided the tutorial downloads section.
Before we make any changes, you’ll need to make sure a key setting for working with resources is set correctly in User Preferences. Go to Edit -> User Preferences, and click on the Calculations Tab.
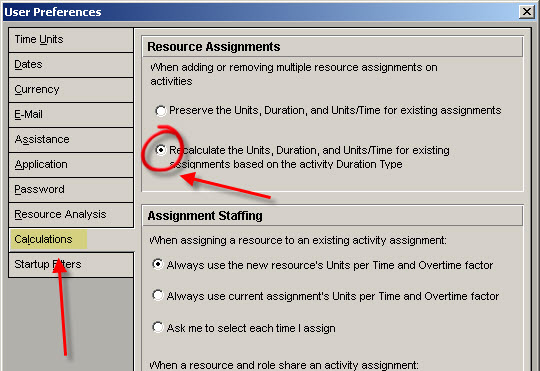
Set the “Recalculate the Units, Duration, and Units/Time for existing assignments based on the activity Duration Type” option. This will make sure that Primavera will perform the necessary recalculations when resources are added or removed from an activity. Close the User Preferences window.
NOTE: this step isn’t necessary when working with Primavera P6 Reflections, but I like to set this option when I’m doing resource-based scenarios.
Step 3 – Making changes to your Primavera P6 Reflection project
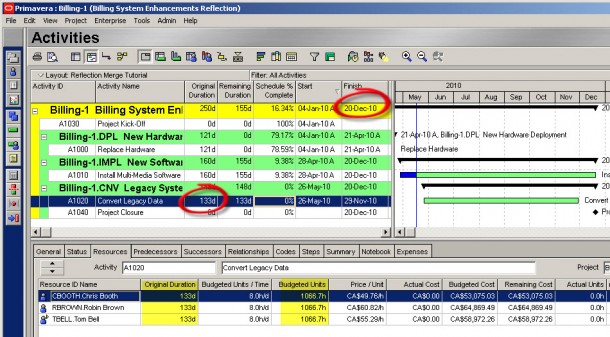
Find Activity A1020 – Convert Legacy Data. You’ll be adding another resource to Activity A1020 to see how this will affect the project’s overall finish date.
Since the activity’s Duration Type is set to “Fixed Units”, adding an additional resource will have the effect of reducing the activity’s duration and spreading the units equally over the 3 resources assigned. Let’s give it a try.
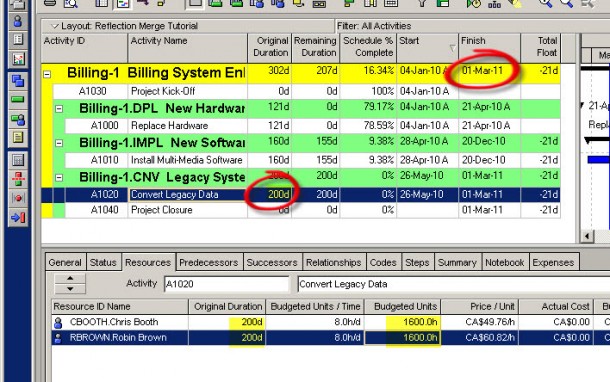
I’ll now add resource Tom Bell as a new resource assignment to A1020 and reschedule the project using the current data date and check the project’s finish date.
The project should now finish on Dec 20, 2010 whereas before it was scheduled to finish on March 1, 2011.
Step 3 – Reviewing the Reflection Differences Report
One of the best features of working with Primavera P6 Reflections reveals itself when you initiate a Merge – the differences report.
The differences report will show you specifically what has changed in your Primavera P6 reflection project.
Go back to the Projects window and right-click on the Reflection project – “Billing-1”.
Choose “Merge Reflection into Source Project” from the menu. You should now see the Differences Report window.
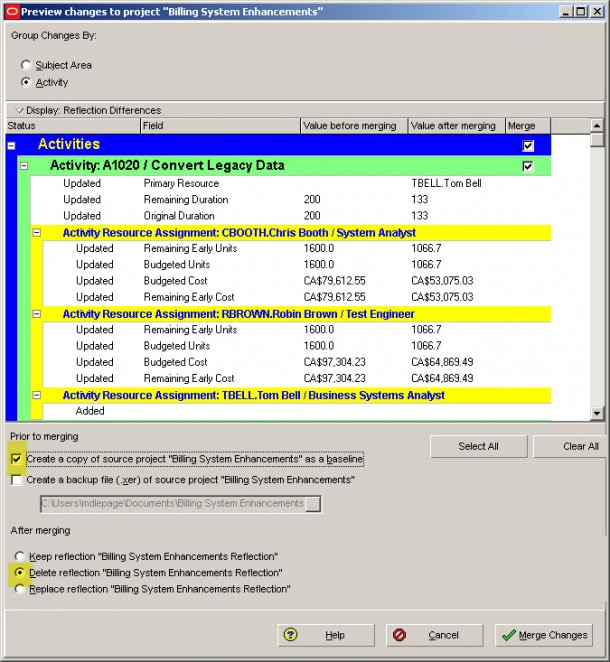
This screen is really nice. It provides you with a report on the differences between the original project and the reflection at the activity level. You’ll see the value for say Remaining Duration from the Source Project, and the updated value from the Reflection project.
From here you can choose which changes you want to merge into the original, or leave out by checking the box in the “Merge” column next to the item. Don’t like the updates on a particular activity? Just leave them out.
Primavera P6 also gives you some options to archive the original project, either as a baseline or as an .xer export file. This is *essential* as you’ll likely need to keep the original project around. And you can also choose how to handle the reflection – keep it, delete it or replace it (update it) with the new merged project.
Step 4 – Merging the Reflection into the original project plan
If you agree to merging the projects, you can go ahead and set the options as above, and click “Merge Changes” to finalize the merge. You may want to print this differences report first, or you might even copy and paste it into a text document before you Merge. You can do either of these by clicking the Display bar.
With your scenario complete, don’t forget to communicate the results.
Merging Primavera P6 Reflections – Limitations
The merging process between a source project and a reflection project has some limitations that I’ll do my best to outline here.
Permissions to Create Reflections and Merge
The following permissions apply if you are running a version of Primavera P6 Professional that connects to an enterprise database – not a standalone version.
In order to be able to create a Primavera P6 Reflection project, you will need to have the permission to “Add Projects” in whatever Project Security Profile you are assigned. Most folks will already have this permission.
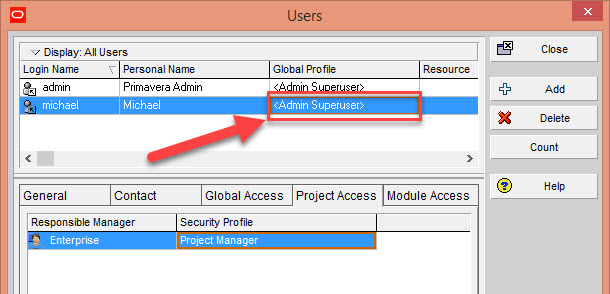
The ability to merge reflections requires further permissions. In order to be able to merge a reflection, you will require BIG ACCESS – yes – Super Admin. You will need to have the “<Admin Superuser>” Global Security Profile in order to merge reflections.
Deleted Data in your Reflection Project
If you have deleted data in the reflection project, Primavera P6 will have a very difficult time resolving the differences when you merge the project back together. According to Oracle, the Merge cannot distinguish whether or not an item was deleted from the Reflection or if the item was added to the Source after the Reflection was created. (Here’s another way to compare 2 project files.)
Thus any deletions in your reflection will not be deleted in the source project during merge.
More specifically, the following items will not be removed from the source project if they were deleted from the reflection:
- Activities
- Relationships
- Resource Assignments
- WBS elements
- Work Products and Documents
- Project Expenses
- Project Issues
- Project Risks
“Merging will not necessarily remove items from the source project that have been deleted from the reflection. If major elements of a project have been deleted from the reflection, you will have to manually delete them from the source project if you do not want to keep the elements in the source project. Elements that are not deleted during a merge include Activities, Resource Assignments, WBS elements, Work Products and Documents, Project Expenses, Project Issues, and Project Risks.” (Primavera P6 Reflections help file)
Right away, this puts some limits on what you can do with reflections. But it’s clear that they were not meant to support major changes between source & reflection, only smaller, incremental changes.
Dealing Duplicate entries after merging
Another set of limits is when you change the following items in the reflection:
- Project ID
- Activity ID
- Resource ID
- Role ID
- Cost Account
- Price/Unit
Any changes to these items will result in new items being added to the source project.
For example, let’s say you change renumber Activity ID ENG-2050 to a new ID of ENG-3050. That change will not be merged into the source project.
Instead, a duplicate activity, ENG-3050 will be added to the source project, resulting in 2 identical activities with different IDs.
The same behaviour applies to the other items in the list above.
So you’ll definitely have to review your schedule after a merge to ensure there’s no duplication.
What else you should know about reflections:
- Primavera P6 Reflections are only available in Primavera P6 Professional (windows) and not in Primavera P6 EPPM (web) (check out this article for ALL of the differences)
- Check Primavera P6 help file for more information, like this handy FAQ about reflections
Wrap Up
Primavera P6 Reflections and merging features in Primavera P6 are great features for the planner or scheduler who needs to run project scenarios or hypothetical analysis.
Many planners also use reflections to help with progressing their project, especially when subcontractors are involved.
Things for you to try:
- Try making more than 1 reflection of the same project to compare multiple scenarios
Download Tutorial Files
- Want to follow along with this tutorial? Grab the files below.
- Project .xer and Layout [Reflections-Tutorial.zip] – Don’t know how to import our layouts? Read how here.
This article was originally published in August 2011. It has been updated for accuracy.


