
Importing data from Excel can be challenging due to various factors, such as selecting the appropriate columns and formatting them correctly to ensure a seamless and error-free import process. Let me guide you through the correct process for updating Primavera P6 by importing data from Excel.
Benefits of Importing from Spreadsheets
- Ease and Efficiency: Excel is easy to use and allows for efficient data entry and management.
- Collaboration: Different departments can update progress in a shared spreadsheet, promoting teamwork and real-time updates.
- Error Identification: Mistakes can be easily spotted and corrected within the spreadsheet.
- Familiarity: Most users are more familiar with Excel compared to Primavera P6, reducing the learning curve.
- Timesaving: Using Excel can save time by streamlining the data entry process.
- Standardization: Procedures can be standardized in Excel to ensure no details are missed, improving consistency and accuracy.
Challenges of This Method
- Error Detection: Errors can be difficult to catch and may go unnoticed after the import.
- Formatting Issues: Mistakes in formatting can lead to import errors and inconsistencies.
- Attention to Detail: Ensuring accuracy and attention to detail can be challenging, leading to potential data integrity issues.
Step-by-Step Guide for Importing Data from Excel
Step 1: Prepare a Template for Departmental Updates
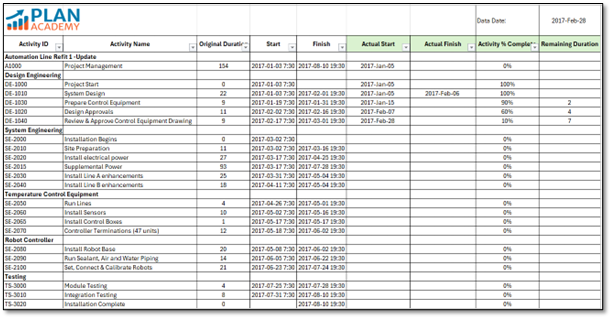
Ensure you have a well-structured template to collect updates from various departments. Your template should look like this:
Note:
- Columns Not to Edit: Activity ID, Activity Name, Original Duration, Start Date, and Finish Date should not be edited as they are copied from Primavera P6.
- Columns to Update: Actual Start, Actual Finish, Activity % Complete, and Remaining Duration should be added manually and updated at regular intervals.
- Training: Offer a quick guidance session or training to every department responsible for providing updates.
- Focus: Emphasize the importance of accurate data entry and highlight the specific columns they need to update.
Step 2: Once you have received the updates, it’s time to export the spreadsheet from Primavera P6 to Excel. This exported spreadsheet will act as a template for importing the updates back.
Steps to Export the Spreadsheet from Primavera P6
- Open your project
- Go to Files > Export
- On the Export dialog box check Spreadsheet – (XLSX) > check Activities > check Export > Modify Layout > Select file location to save > Finish.
Note: Ensure the layout is modified to include the following columns:

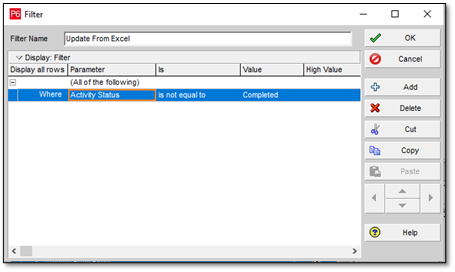
You can create a new filter to export only the activities that are either in progress or not yet started.
Upon successful export, your spreadsheet file should appear as follows:
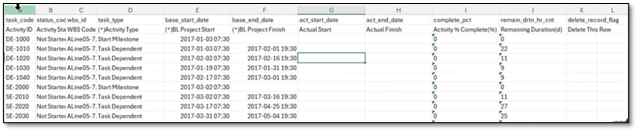
Including these columns is essential to ensure the updates are correctly captured in the exported spreadsheet and can be successfully imported back into Primavera P6.
Step 3: Next, use the VLOOKUP formula to transfer data from the initial template, where updates from various departments were collected, to the exported Excel sheet.
Your VLOOKUP formula should be structured as follows:

Note: Using the Activity ID, you can easily transfer data from the update sheet to the import sheet. Once you have used VLOOKUP to pull the data, ensure you copy all the data and paste it as values to remove the formulas from the import sheet.

Step 4: Properly Formatting the Data
Proper formatting is crucial for successful data import. Use the following formats for these columns:
| Columns | Format |
| Activity Start & Finish | yyyy-mm-dd hh:mm (2017-01-05 7:30:00 AM) |
| Activity % Complete | Text |
| Remaining Duration | Text |
| Activity Status | Text |
Note: You can use the Baseline Start and Baseline Finish columns to replicate the format for the Actual Start and Actual Finish columns. Additionally, you can copy the time from the Baseline Start and Finish columns into the Actual Start and Finish columns.
- Activity % Complete: This should be in text format, with 100% written as 100 (without the % sign).
- Activity Status: This should be in text format.
- Remaining Duration: This should also be in text format.
Step 5: Save the import file after changing the formats and import it to Primavera P6
Following are the steps for importing the file.
- Launch Primavera P6 and open the relevant project.
- Go to Files > Import
- On the Import dialog box check Spreadsheet – (XLSX) > select File to import > check Activities > Select Project to import > Finish.
After completing these steps, you will see the updates successfully imported into Primavera P6.
Importing data from Excel into Primavera P6 provides ease, efficiency, and enhanced collaboration. However, it also poses challenges like error detection and formatting issues. Understanding these aspects helps ensure a smooth and accurate data import process.
