Primavera P6’s Activity Layouts can be a super-feature for helping you to plan, analyze, and progress a schedule. But what about exporting Activity Layouts to other copies of Primavera P6?
In this post I’ll show you how to import and export those precious Primavera P6 Activity Layouts.
The Activity screen is where we spend 95% of our time as Primavera P6 users. Having a facility to configure an Activity layout just the way we like it and to save layouts for reuse is truly an invaluable feature.
Activity Layouts that are created in Primavera P6 as “Global” can be accessed by others who work in the same Primavera P6 database. But if you want to copy an Activity Layout to another Primavera P6 database, you’ll have to follow these exporting & importing steps.
It’s not uncommon to create a few Activity Layouts for a specific project as well. So exporting Primavera P6 Activity layouts to share with colleagues, contractors, subs or even for use in an xer viewer like ScheduleReader becomes pretty important.
To work with Activity layouts, you’ll want to be familiar with Primavera P6’s .PLF file format. This is the file format Primavera P6 uses for importing & exporting Activity Layouts.
Although importing or exporting a Primavera P6 Activity layout might be basic knowledge to some users, it’s definitely not obvious.
And I can’t tell you how many times P6 users contact me reporting that .plf files can’t be imported, because they haven’t followed these steps, and have simply tried to double-click the .plf file to open it. Windows will usually try to open a .plf file in Adobe Reader or some other incorrect application.
Don’t double-click the .plf file; rather follow the importing steps below.
How to Import an Activity Layout (.plf) in Primavera P6
From the Primavera P6 Activities screen, open the Layouts dialog by navigating to the View menu -> Layouts -> Open.
If you get a pop-up asking you to save changes to the current layout, select No (unless you have unsaved changes you want to capture).
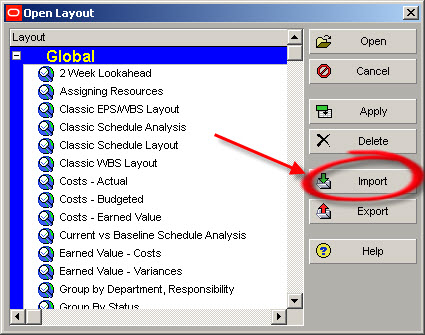
Next, browse and select the .plf layout file you’d like to import into your Primavera P6 database.
On the next screen, choose to rename the layout if you like before you save it, but note that you can always rename it later.
Choose, from the Available To dropdown, to make the layout private (current user), global (all users), shared with selected users (another user) or saved in a project for users of that project (project). Click the Save button.
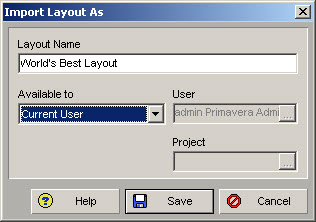
The Activity layout is now imported and saved in your Primavera P6 database. Go ahead and open it to view the wonders of your project through your new layout.
How to Export an Activity Layout in Primavera P6
Exporting a Layout is just as easy and almost the reverse of importing. Here’s what to do:
From the Activities window, open the Layouts dialog by clicking the View menu -> Layouts -> Open. If you get a pop-up asking you to save changes to the current layout, select No (unless you have unsaved changes you want to capture).
Choose the Activity Layout to export from the list.
Click the Export button.
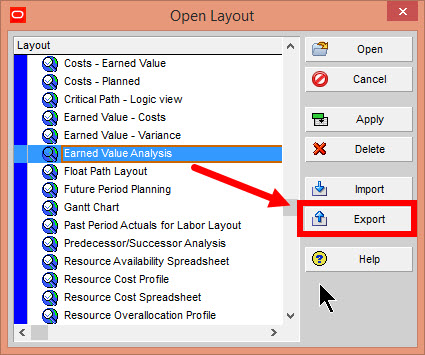
Choose an appropriate name for the .plf file and where to save it on your PC.
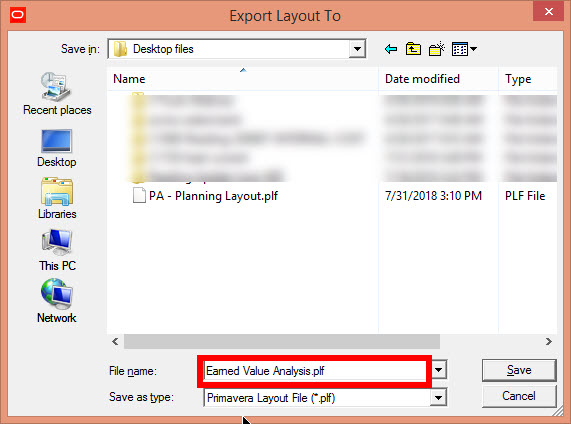
Click Save.
Now you can share that file with other Primavera P6 users so it can be imported into another Primavera P6 database for use there as well.
Wrap up
Importing and exporting Activity layouts can be very helpful, especially when you need to transfer them across databases. Keep in mind that all of the steps above also work for layouts on the Projects, WBS, Resource Assignments, and Tracking windows.
Editor’s Note: this blog post was originally published Sept 14, 2011. It has been updated for accuracy & comprehensiveness.

