A lookahead filter in Primavera P6 provides us with the ability to create lookahead reports. Lookahead reports are one of the centerpieces of consistent project reporting and controlling. Lookahead reports filter and highlight upcoming activities in the project. Most common lookahead reports focus on activities scheduled for the upcoming week, next 2 weeks, next 3 weeks, next month and next 3 months. Of course there are other variations and the determining factor will be the type of project being worked. The nice thing about Primavera P6 is that you can build a custom filter that will lookahead any period that suits your needs.
The key to a lookahead report is building a proper lookahead activity Filter. Recall that an activity Filter will show only activities that meet the Filter’s criteria – all activities that don’t meet the criteria will be hidden. Knowing how to program the Filter’s criteria is essential. And in this tutorial we’ll show you how to do it. Here’s how to build a lookahead filter in Primavera P6.
Lookahead Filters in Primavera P6
Tutorial Files
Complete this tutorial by downloading the following files:
Step 1 – Finding Your Footing With Filters
Start by opening a project plan. You can’t build any filters in Primavera unless you have a project open.
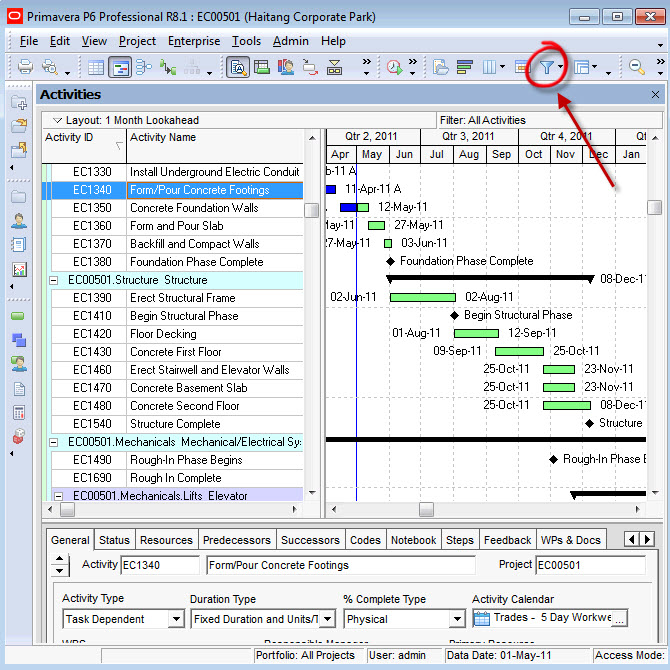
Click the Filters icon on the toolbar OR goto Views -> Filters in the menus. Click New to add a new custom filter.
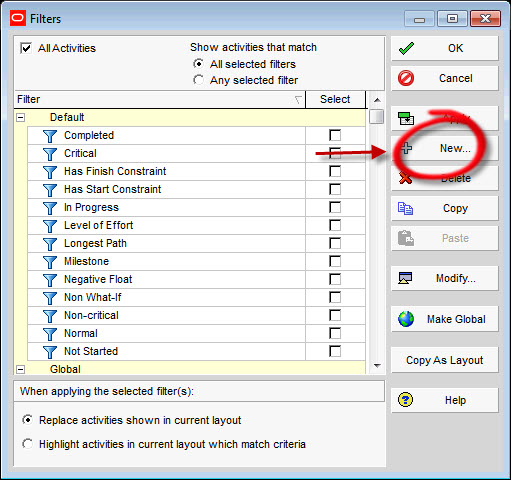
Step 2 – Creating A Custom Filter In P6
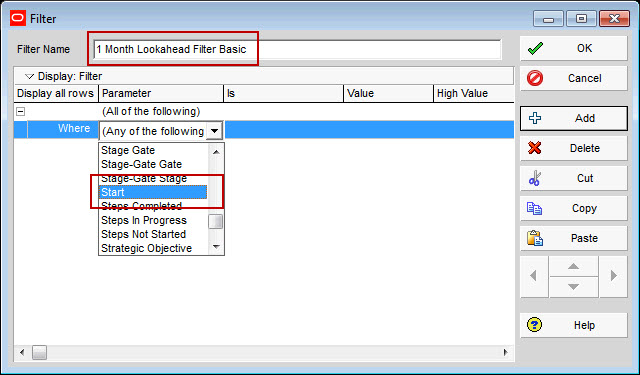
Name your filter “1 Month Lookahead Basic”. Now to do the programming part.
Click in the empty field in the “Parameter” column. You should get a dropdown box with a long list of field names. In this list, find the entry “Start” – which is the column that represent activity start dates.
Step 3 – Programming The Filter
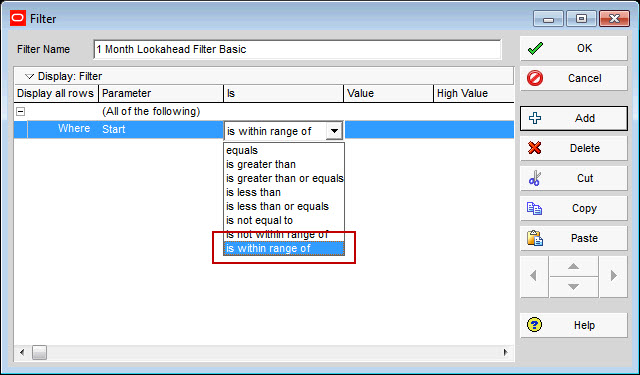
Click in the “Is” column and choose “is within range of” from the dropdown list.
Step 4 – Using Primavera’s Built-In Date Variables
When building a filter that uses a range (as in our choice from Step 3), we’ll have to specify an upper value and a lower value for the range in question. Then in the next column “Value” we’ll specify the lower value of the range. Click in the “Value” column – you should see another button become available. If you click it, you’ll see the menu below. The choices in the menu represent some of Primavera ‘s built-in date variables. For example, the variable PS represents the Project’s Start Date that was specified when the project was first created. For our filter, we’ll use the variable DD – the project’s Data Date.
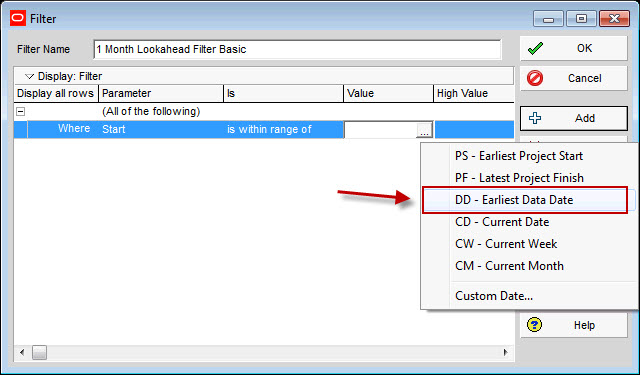
Now click in the “High Value” column. This type we’re going to type in a short formula. Type in “DD+1M”. This formula sets the upper range to “1 month more than our current Data Date”. For example, if our current Data Date is March 3rd, this formula would set the upper range to March 3rd + 1 month which is April 3rd.

NOTE: If you hit Enter after typing in DD+1M, you will likely have a new line added to your screen. Go ahead and delete that line by clicking the “Delete” button on the right.
Step 5 – Viewing The Filtered Results
Click OK to lock in your custom filter. You should notice that your new filter is checked on. Click OK to view your project with the filter on.

The filter should show you a short list of activities scheduled to start in the next month (assuming your Data Date is set to reflect the last status date and you are statusing on a consistent basis). In our sample project, we’re only showing 2 activities planning to get started in the next month.
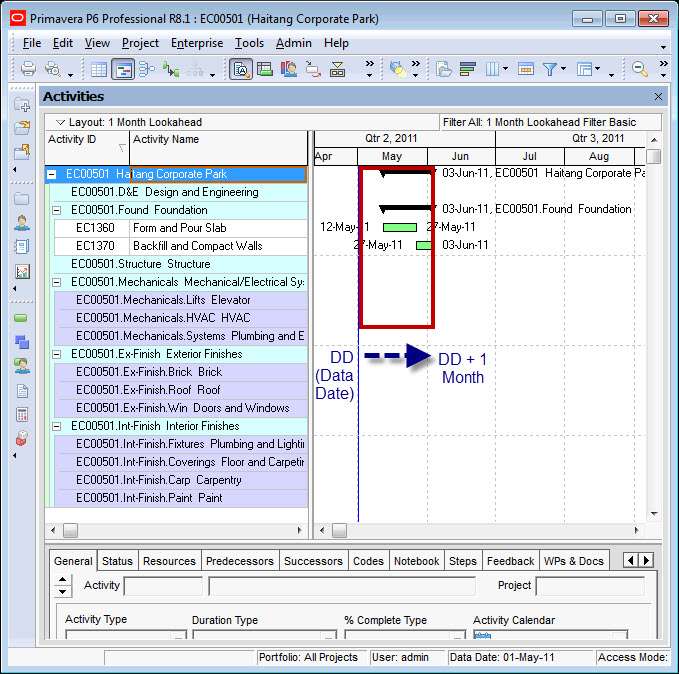
A lookahead report can be essential for focusing on soon-to-be-starting activities. You could easily print this layout or create a Report from this data to discuss at your weekly project meeting.
Creating a Better Lookahead Filter in Primavera P6
The basic lookahead filter in Primavera P6 you’ve just built works well in ideal situations but it doesn’t quite meet the mark in other cases. For example, it leaves out in-progress activities which you will likely want to be aware of. In the case where activities started earlier than planned, it won’t show you those either. So let’s show you how to build a better lookahead filter.
Step 6 – Make A Copy Of The Basic Lookahead Filter
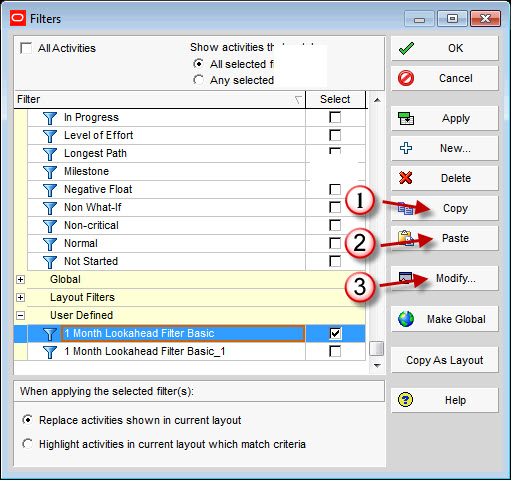
Go back to the Filters window by clicking the Filter icon on the toolbar. Highlight your “1 Month Lookahead Basic” filter, click the Copy button and then the Paste button. Highlight the new copy and click the “Modify” button.
Step 7 – Tweaking The Primavera Filter To Include In-Progress Activities
Rename the filter to “Better 1 Month Lookahead”. Start reprogramming by changing the paramete in the “Value” column (currently DD). We’ll change this to “PS” instead – the Project Start Date.
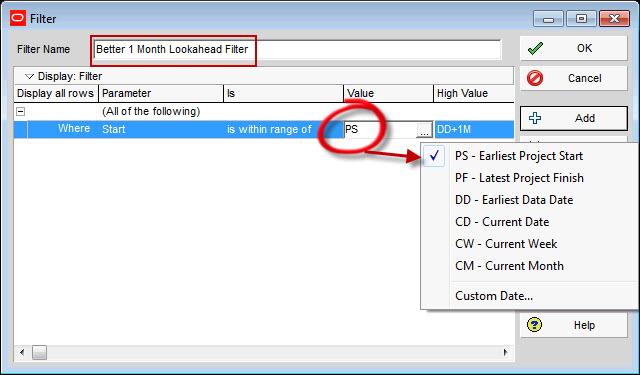
Next, click the “Add” button to add a line. Click the Parameter dropdown box and find “Activity Status” in the list. Change the “Is” column to “Is Not Equal To” and set the “Value” column to “Completed”. Click OK.
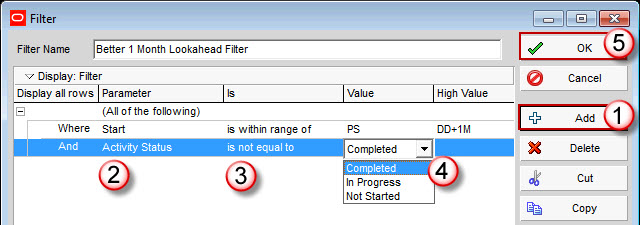 Place a checkmark next to your new filter to turn it on and uncheck any other filters to turn them off. Click OK to view the project.
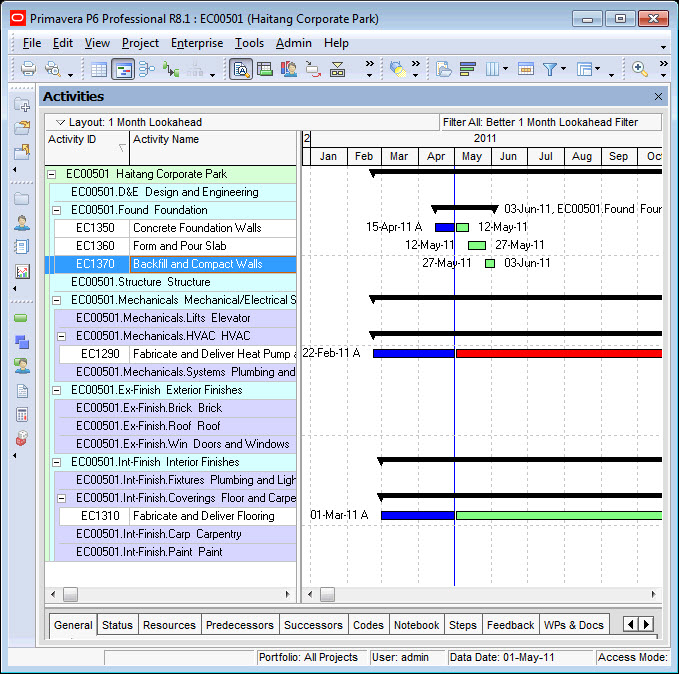
As you can see, the new filter includes the original 3 activities due to start in the next month PLUS any activities are that are still in-progress. This new filter is much more complete now and will ensure you report on all planned and in-progress activities in the filtered range.
Wrap-Up
Lookahead filters in Primavera P6 are fundamental to reporting and monitoring your project on an ongoing basis. Create these lookahead filters in your Oracle Primavera database and make them Global so you can share them with your colleagues and start to set a standard for reporting in your organization.
Don’t forget to download the Tutorial Files back at the top of this post. We’ve included a layout your can import that has all 3 Lookahead Filters.


